


last updated June 13, 2017
I love animation. What I love most is how animation can perform the classic writing maxim of “show, don’t tell.” With its exaggerated physics, animation doesn’t just show you what’s happening, it shows you how what’s happening feels. I’d prepared a whole paragraph on haptic feedback, and how it shapes product design for 3-dimensional objects, and how animation’s ability to convey feeling could visually approximate that haptic feedback… but I got a little carried away. There are plenty more straightforward user experience reasons to include animation, and in the end, this is blog post is primarily about one means for incorporating a specific type of animation into your project.
This approach uses Adobe’s After Effects program to create the animation. For the purposes of this post, I’m going to assume that you have an After Effects composition that you’d like to use, but if not, there’s a world of tutorials out there to help you. Once you’ve got a nice composition going in After Effects, we’ll use Bodymovin (like the Beastie Boys song), to get it out of After Effects and into our site. Bodymovin has two components:
- an extension that you can integrate into After Effects, which exports your AE composition into a
.jsonfile containing all of the animation’s data, and - a JavaScript library that you can integrate into your project, which loads the animation from the data and can be used to control when and how the animation is played.
Working with the Bodymovin Extension
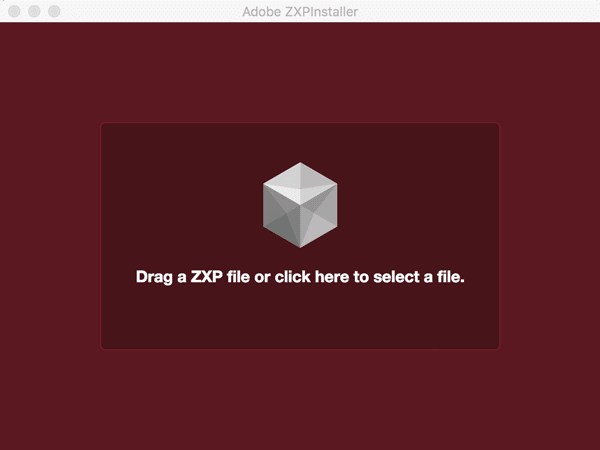
To get the Bodymovin’ extension, download the zip file from the GitHub repository. There is a script for installing the .zxp file here. Just close After Effects, open the installer, and drag the Bodymovin file on to its view so it can handle the installation.
To confirm that the extension was installed, open After Effects and go to the Window menu, there will be an item called Extensions which should now include Bodymovin.

Clicking on this will open a new window with the Bodymovin’ interface, which will show a list of your open compositions. If you don’t have any compositions open, go ahead and open one, then refresh.

Select the settings gear icon next to the composition you’d like to export. As you can see below, there are a number of configuration options that will shape the type of output you’ll get. As most of my animations have been small and relatively simple – I haven’t yet had cause to select most of these these options, but let’s take a look:
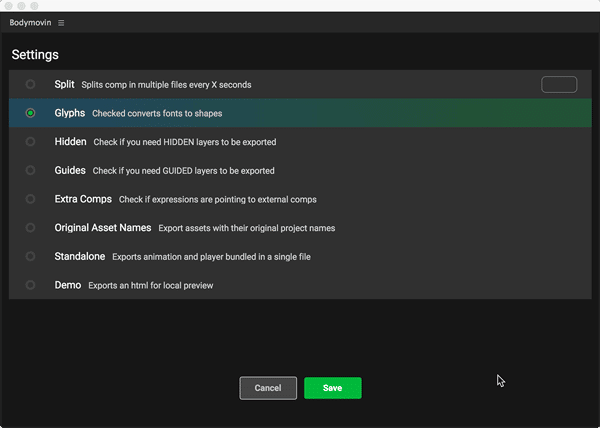
The first six settings relate to how the different parts of your composition are compiled for export, namely:
- reducing large animations into smaller pieces, so that they can be loaded in parts,
- handling text-based animations as outlines,
- managing particular types of layers (Hidden, Guides), and
- managing objects external to the current composition (like links to other external compositions, or imported assets like sound or images).
The last two settings relate to the type of output you get:
Standalonewill export a JavaScript file, which bundles the animation’s.jsonand the player together.Demowill export the animation’sdata.jsonand ademo.htmlfile. This is a really nice option if you just want to see what the output will look like.- Selecting nothing will just generate a
.jsonfile of the animation data which is what we’ll be using for the following steps.
Finally, we’re going to set our destination path.
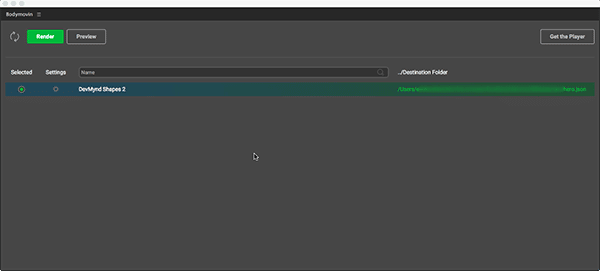
If you’re using the Demo mode to preview your animation, you can set the path to whatever convenient workspace folder you prefer. If you’re placing your animation within the context of an application, you could start by setting the path to the root of your project, though it’s probably nicer to eventually direct it to the directory where you keep images and other assets for your project. You can also change the file name at this point to something more descriptive, for this example, I’ll change the default data.json to hero.json.
Working with the Library
This example project uses a barebones Create React App template, but you certainly don’t need to use React to use this library. Once your project is set up, just run npm install --save bodymovin or yarn add bodymovin to add the library to your project. Within the view or component in which you want to load your animation, import the Bodymovin library and the hero.json file. For simplicity’s sake, this example adds an animation to the main App file, but these animations can be added to individual views or UI elements in a more granular way. So far, our App.js looks like this:
https://gist.github.com/prettyhandsome/1742bc61ff53c7e8afff03ff163a5848
One thing to point out for people using this in React, this view has a animationDiv element to which a ref has been added, we’ll need that ref in a moment, when we load our animation.
With the pieces in place, we can load our animation. We’re going to call the bodymovin.loadAnimation() function, which takes an object with the following properties:
https://gist.github.com/prettyhandsome/24874f617b0756af36e0f4510eb79eb6
You can call loadAnimation() pretty much anywhere in a regular .js file, but since the example app uses React, it makes sense to load the animation during the componentDidMount() lifecycle hook. There are a couple of snags with doing so, however: our animationDiv might not be available to us yet, and the component mounts every time the page refreshes (which can be quite a lot). So, I like to pull the loading logic out into its own method, where it can check to see if the animationDiv is present, and won’t reload the animation if its already there. At this point things are looking like this:
https://gist.github.com/prettyhandsome/caa7386dcda76fde28cf5d2a07a12082
There should now be an infinitely-looped, autoplaying animation on the page. Now that we know that the animation is loading, you can really have some fun. There are so many aspects of the animation’s behavior that you can control: the visible frame of the animation, the frame at which the animation stops or starts, the speed at which it plays, and whether it plays forward or backwards. You can also tie the animation’s behavior to events, and use the animation’s own event callbacks. The Bodymovin repo has a full list of the methods and event callbacks for the library and the animations here. This can be pretty powerful in combination – think of an element like a button: rather than setting autoplay to true, you can call the goToAndStop() function to point the animation at a frame that looks like a disabled state, you could then select a different range of frames to play when the button is clicked, and use a bodymovin callback to redirect or refresh once the click animation is complete. I’d also recommend visiting the codepen animations referenced on the repo, it’s a really good opportunity to play with the possibilities (and to get some inspiration about the types of compositions you can make with After Effects).
Tandem is innovation firm in Chicago and San Francisco with practice areas in custom software development, mobile and web application development.