last updated July 18, 2017
We recently completed a project which included a standard star schema dimensional model. At first, we were using Ruby to do this. We’ve had success with this in the past when we’re dealing with a couple million rows. Caching dimension tables, using bulk-insert or activerecord-import along with some cleverly scheduled sidekiq jobs can result in a decent ETL approach, but we hit a wall when processing historical data. We had a few tricks left to try, but it was clear we were going to be hitting about 500-800 million records in more than a few tables. It was time to investigate another approach.
Oh goodie! New toys!!!
We decided to investigate Amazon Redshift. We’re not settled on it for this use case. Not even done with the full PoC. But the results of data import were pretty impressive. We’re also happy about the fact that there’s a Redshift driver for ActiveRecord. Furthermore, the client is happy there is a SQL interface so that his existing people can talk to it using common tools. Everyone wins.
Today I’m going to walk you through how to fire up a Redshift cluster using Terraform and load some CSV data from S3 into a star schema with Type 2 Slowly Changing Dimensions. Hopefully, this template can give you an idea on how to fire it up and start investigating if it’s a good fit for your data.
Firing up a cluster
If there’s one thing that turns me nuts about AWS, it’s the interface. If only it were pretty and easy to use. Or purple. But it is cheap and powerful. So instead of using that atrocious UI, Ty Cobb taught me Terraform and together we wrote a script to fire up and tear down a cluster. Provided you have the aws cli configured and appropriate permissions, you can use this script wholesale. This is not production hardened or tested in any way but it should get you started.
provider "aws" {
  region = "us-east-1"
}

resource "aws_redshift_cluster" "tag_poc" {
  cluster_identifier = "tag-poc"
  database_name      = "tag_db_poc"
  master_username    = "jhirn"
  master_password    = "passworD1"
  node_type          = "dc1.large"
  cluster_type       = "single-node"
  skip_final_snapshot = "true"
  cluster_security_groups = [
    "${aws_redshift_security_group.default.id}"
  ]
}

resource "aws_security_group" "redshift_sg" {
  name = "redshift-tag-sg"

  ingress {
    from_port = 5439
    to_port = 5439
    protocol = "tcp"
    cidr_blocks     = ["0.0.0.0/0"]
  }
}

resource "aws_redshift_security_group" "default" {
  name = "redshift-sg"

  ingress {
    security_group_name = "${aws_security_group.redshift_sg.name}"
    security_group_owner_id = "${aws_security_group.redshift_sg.owner_id}"
  }

  ingress {
    cidr = "0.0.0.0/0"
  }
}
I’m not going to go through how to install Terraform or the aws-cli but I used homebrew. Use the googles for that. Once it’s ready to go a simple terraform apply over the script above gets you up and running in a few minutes. Once it’s ready you can use the standard psql tool to log into the instance. Pretty sweet.
It’s all SQL from here.
Getting data into Redshift
Getting data into the mart happens in two steps. First, we need to copy raw CSV data into tables so we can query it back out and massage it into our mart. Keep in mind, Redshift Spectrum can query directly from CSV files in S3. However we’re going to enrich the data and querying from tables is more standard. We chose to use temporary staging tables to get data out of S3 as quickly as possible. for this. What’s nice about temporary tables is that they are only visible to your current session. This means we don’t have to worry about using custom table names to avoid collisions. They also clean up after themselves. We’re going to create our tables with these statements.
(Some of the column names have been omitted to protect the innocent )
create TEMP table vendors_staging(
 number integer,
 name varchar(200),
 ...
 change_date date);

CREATE TEMP TABLE products_staging(
 product_number integer,
 product_name varchar(200),
 ...
 change_date date);

CREATE TEMP TABLE sales_staging(
 invoice_number integer,
 customer_number integer,
 product_number integer,
 ...);
These temporary tables need to line up 1-1 with the rows in the CSV files we’re about to import. Once ready we can just run the COPY command. This is a Redshift specific to copy data from a CSV into a table and has a couple of extra options to go with it. CSV is obvious. IGNOREHEADER 1 says to ignore the headers which our files have. The DATEFORMAT specifies the format of the dates. Our import file uses “00000000” for dates intended to be NULL so ACCEPTANYDATE will accommodate that.
COPY products_staging
FROM 's3://..../products_master.csv'
WITH CREDENTIALS 'aws_access_key_id=YEAHRIGHT;aws_secret_access_key=ASIF'
CSV
IGNOREHEADER 1
DATEFORMAT 'YYYYMMDD'
ACCEPTANYDATE;

COPY vendors_staging
FROM 's3://../vendor_master.csv'
WITH CREDENTIALS 'aws_access_key_id=YEAHRIGHT;aws_secret_access_key=ASIF'
CSV
IGNOREHEADER 1
DATEFORMAT 'YYYYMMDD'
ACCEPTANYDATE;

COPY sales_staging
FROM 's3://../sales.csv'
WITH CREDENTIALS 'aws_access_key_id=YEAHRIGHT;aws_secret_access_key=ASIF'
CSV
IGNOREHEADER 1
DATEFORMAT 'YYYYMMDD'
ACCEPTANYDATE;
So running this command takes about 30 seconds for the vendor and product tables which are 2k and 90k rows respectively. Running it for sales which is a 2Gb file with 19.5m records takes around 1m40s. In no way is this a linear scale. So what’s going on? I can only assume some of that time is copying the physical file over and/or loading it into memory because truncating and reloading the sales table takes only a few seconds. I didn’t dig too deep into the internals. We’re in pretty good shape since we’re trying to beat something that previously took hours.
Getting data into our Dimensions
Oh boy, here I go not explaining things again. I don’t want to talk too much about dimensional modeling here. I promised some people I would write about it at some point. But not here =)
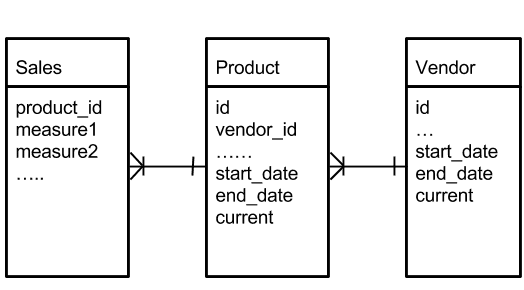
For the sake of the brevity, I’ve only chosen 1 dimension which also has a snowflake. Our model looks something like this.

Note the use of start/end dates and the current flag indicating we are using a Type 2 system to preserve history. Due to the snowflake, we have to be mindful to update first the vendor table so that we can link to the current vendor when looking up by natural key. Despite not receiving deltas for our imports this isn’t very hard. In our staging data we’re receiving a date to indicate when a dimension value has changed. We use this to make a first pass through the staging table and delete anything that already exists with a change date equal to or older than what we already have. Once we’re done with that, we update any existing dimension values with a newer change date by setting its end_date equal to today and its current flag to false. After that, it’s a simple insert defaulting current to true and end_date to null. This was pretty difficult to accomplish in pure SQL so the credit all goes to Ty for figuring this piece out.
Here’s what it looks like in action for Vendors. This entire script took only a couple seconds for 2k rows.
DELETE
FROM  vendors_staging
USING vendors
WHERE vendors_staging.vendor_change_date <= vendors.start_date AND vendors_staging.number = vendors.vendor_number;

UPDATE vendors
SET end_date = CURRENT_DATE, current = false
FROM vendors_staging
WHERE vendors.vendor_number = vendors_staging.vendor_number;

INSERT INTO vendors(
...
start_date,
end_date,
current)
SELECT
...
COALESCE(vendor_chg_date, CURRENT_DATE) as start_date,
null as end_date,
true as current
FROM vendors_staging;
Our SQL for deleting and updating is the same for the inside of our snowflaked table. The only difference is we need do an inline lookup on the vendors’ table when inserting. Such subqueries perform one lookup per row and can be costly, but the entire script still took only a couple seconds for 90k records. Upon typing this, we probably could have done a more efficient join but it took longer to type this sentence than to execute the query.
-- Deletes
-- Updates

INSERT INTO products(
vendor_id,
,,,
start_date,
end_date,
current)
SELECT
(select id from vendors v where v.vendor_number =  ps.product_number and v.current = true) as vendor_id,
...
COALESCE(product_change_date, CURRENT_DATE) as start_date,
null as end_date,
true as current
FROM products_staging ps;
Getting data into our Fact Table
“Facts are simple and facts are straight” -David Byrne
For populating the Fact table, we join the staging table to our dimensions for the SELECT portion of our INSERT INTO statement to retrieve their shiny new surrogate keys. The rest is straightforward as facts do not change. They are always appended all.
 INSERT INTO sales(
        product_id,
        customer_id,
        ....)

SELECT
    p.id as product_id,
    c.id as customer_id,
   ....
FROM sales_staging ss
    INNER JOIN products p ON p.product_number = ss.product_number and p.current = true
    INNER JOIN customers c ON c.customer_number = ss.customer_number and c.current = true;
The above statement took 101 seconds to process 19.5 million records. That’s 193k records a second. In pure Ruby with bulk insert, we were only hitting around 1,500 records a second. This was on a Heroku performance dyno and the standard Postgres database configuration, so not a lot of hardware. I’m sure we could improve that quite a bit but it’s unlikely we’d hit 2 orders of magnitude. Redshift is just good at this kind of stuff.
Cool story. How’s the query performance?
So fire up the ActiveRecord adapter we could just plug our app right into these tables. Without any tuning however, the results were a bit hard to understand. Something like Sale.first.product did not run fast on the first execution. Close to 2 seconds. On the second query, it would be milliseconds. I’m guessing the way that Redshift does caching is optimized for cycling through huge result sets. Additionally select * is a tall order for columnar data stores, negating some of their benefits.
We also did not get a chance to play around with distribution or sort keys. Not yet at least. When we do you can look forward to a part 2 of this blog post.
I hope this helped someone. If you have any comments or questions you can hit me up @jhirn5000 on the twitters.
Cheers!
Tandem is software development companies in San Francisco with practice areas in custom mobile and web application development.


